How to Make a Paper Menorah
During Hanukkah (Chanuka), on each of the eight nights, a candle is lit on a special menorah or candelabra called “hanukkiyah.” The ninth candle, which is found in the middle of the lamp, is called the “shamash.” It is used to light the other candles each night. The menorah is one of the most familiar symbols of this holiday. At Excel Blades, we wanted to create fun Hanukkah crafts for kids so every child can make his or her own decorative paper menorah.
This simple DIY Hanukkah Menorah is a great kids’ craft that everyone will love! You can use your paper candelabra as a beautiful centerpiece that you can reuse every year.
Since this paper craft does not involve real candles, it is a safe project for your children to do on their own or with the family. With materials you already have around your house, you can create this charming Hanukkah craft in no time.
How to Make a DIY Menorah
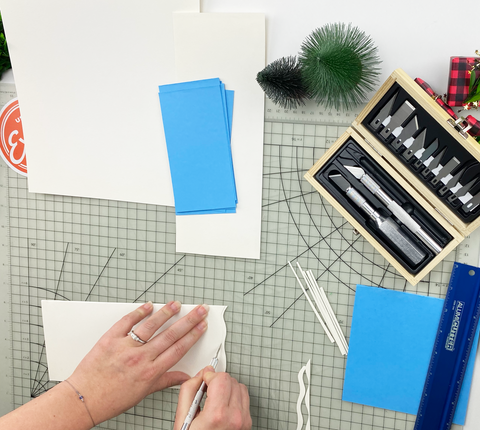
To create your own menorah, you only need a few simple supplies. Our easy DIY paper Hanukkah menorah uses the following materials:
Materials
- Excel Blades 18" x 24" Cutting Mat
- Excel Blades Craftsman Set – 44383
- Alumicutter Ruler from Alumikit - 90123
- Different Colored Papers (For the most traditional look, we recommend blue and white for the candles and orange and yellow for the flames.)
- Cotton Swabs
- Cardboard
- Tape
- Hot Glue Gun
Once you’ve gathered your supplies, you can start making your menorah craft. Follow our helpful step-by-step instructions to create a detailed menorah, complete with paper candles and flames to help you and your family celebrate each night of Hanukkah.

Step 1: Take your blue paper and fold it in half lengthwise. Take your white paper and fold it in half widthwise.
Step 2: Grab your K1 Knife and the Alumicutter Ruler. Measure and cut the blue paper 3 inches wide. Continue this process until you have 4 folded flaps of 3-inch wide blue papers. Then, measure and cut a 3-inch wide flap with your white paper. You will only need 1 white piece of paper. We chose to switch our #11 blade for our #16 Stencil Edge Blade for this process; however, you can use the #11 blade or any blade you feel the most comfortable with.

Step 3: Open each flap and cut along the creased line. After your paper is cut, you will have created a card. Once complete, you should have a total of 2 white cards and 8 blue cards.

Step 4: Using one of the white cards you’ve cut in half, cut out a design to decorate your blue cards. Grab a blue piece of paper and do the same for your white card. We chose to cut strips of paper and waves, but you can get creative and cut different shapes of all sizes.
Step 5: Next, grab tape and roll the first blue card lengthwise into a cylinder. Place the tape on one edge of the paper and roll the paper so the opposite edges meet. Press down on the tape so it sticks. You have created your first candle! Continue this process until you have 8 blue candles and 1 white candle.
Step 6: Now it is time to decorate! Using your glue gun, glue your strips, waves and/or shapes to your candles. Decorate all the blue candles with the white paper and the white candle with the blue paper.
Step 7: If you have any excess paper from the strips and waves you glued to your candle, cut them off with your K1 handle.
Step 8: Next, grab your yellow and orange papers. Cut out 9 small teardrops from your yellow paper. Then, grab your orange paper and cut out 9 large teardrops. We chose to switch out the #16 Stencil Edge blade for our #10 Curved Edge Blade.

Step 9: Grab your cotton swabs, glue gun and teardrops you have just created. Using your glue gun, apply a small amount of glue to the smaller teardrop. Take your cotton swab and glue the smaller teardrop to the swab. Then, add glue to the opposite side of the swab and glue the larger teardrop to the back. You have created a flame for your candle! Continue this process for the remaining 8 swabs.
Step 10: Using your alumicutter and K6 knife, measure and mark your cardboard at 11 inches. Cut the cardboard where you have made your marks. Make sure the cardboard is as even as possible.
Step 11: Grab your glue gun and any colored paper you choose. Glue the paper to the cardboard. This will be the stand for your candles. Once you have glued down the paper, flip over the cardboard. Cut off the excess paper.
Step 12: Place your candles on the stand with the white candle in the center.
Tip: You can glue the candles onto the stand so they do not move.
Step 13: Add your flames to the candles when you are ready to “light” the candle for that night. You have created your Paper Menorah!

This paper menorah for Hanukkah is a fun craft for the whole family! Not only is this a time you can spend together, but it is the perfect time to share the story of the Jewish Festival of Lights.
More Hannukah Crafts
As you prepare for Hanukkah by making your paper menorah, consider making other holiday-related crafts with your kids. The following Hanukkah craft ideas can help you celebrate the holiday and create special memories with your family.
Paper Dreidel
Playing with a dreidel is a fun Hanukkah tradition. Although originally created to help study the Torah and learn Hebrew, the dreidel quickly became a charming children’s game the whole family can enjoy. If you don’t have a wooden dreidel at home, there are numerous printable paper dreidel templates available online.
Print out your favorite, and use your Excel blades to cut out the dreidel, ensuring you don’t cut the letters printed on the side. Put the dreidel together using tape or glue and use a sharpened pencil or chopstick for the center stick.
Dreidel Banner
You can also create a felt dreidel banner using different shades of blue felt, yarn and Excel scissors. Use a template to draw dreidel shapes on the felt and cut them out using your scissors. Decorate the dreidels with shapes like the Star of David or tiny flames. Then, glue the dreidel shapes evenly spaced apart onto your yarn. Hang your banner on the staircase, doorway or window frame.
Paper Star of David
The Star of David is an important symbol of protection and safety, and an integral part of any Jewish celebration. You can create decorative stars using popsicle sticks or clothes pins to hang around your home during Hanukkah. Or, fold an origami Star of David to decorate your table, window sill or mantelpiece where you plan to place your Menorah.
Star of David Luminaries
For a super simple craft, create beautiful Star of David luminaries with white or kraft brown bags. Have your kids stamp, draw or print out the Star of David on several paper bags and line them up along a walkway or on a table or mantel. Then, place battery-powered tea lights inside the bags for a festive display.
Celebrate a Safe and Happy Hanukkah
We hope you enjoyed creating this beautiful Paper Menorah as much as we did! As a creative Jewish mom, it’s helpful to have a list of crafts you can work with your kids on to help them celebrate their Jewish culture and religion. Getting young children involved in creating a non-flammable version of this important symbol lets you talk to them about the meaning behind it and make Hanukkah a special time of year.
Don't forget to show us how you DIY by tagging us on Instagram at excelblades and excelblades.co. Subscribe to our YouTube channel for more DIY projects and tips on our tools.