How to Emboss Paper Like a Pro
Embossing is a beautiful way to add texture, motifs and beauty to paper. Whether you’re making homemade cards, embellishing scrapbook pages or other paper crafts, embossing is a great way to add a three-dimensional interest.
In this article, we’ll cover what embossing is, the terminology associated with it as well as embossing tools and techniques.
Browse Embossing Tools to Emboss Like a ProSo, what is embossing?
It’s the process of raising paper as well as other soft malleable materials like metal, leather and vinyl using various tools and techniques to create a raised pattern or image. In manufacturing, sheet metal can also be embossed with specialized machinery and presses.
There are a few words to add to your art glossary before you dive into embossing projects.
Blind Embossing - changes the surface of the paper without the use of embellishments like color, ink or powders.
Debossing - a technique where the design is recessed or sunken in the paper or other materials.
Dry Embossing - also known as Relief Embossing, is a technique where a design is traced with an embossing stylus in order to create the design.
Embossing Ink - used in heat embossing, thick consistency and slow-drying.
Embossing Powder - used in heat embossing, fast-melting powder in colors or metallics.
Embossing Stylus - a tool used for embossing, usually made up of a handle and a tip. Tips come in various shapes or sizes as well as materials they’re made of.
Heat Embossing - a technique that requires a heat source like a heat gun to create a raised pattern or image.
Heat Gun - a craft tool that directs heat onto a targeted area without using air. Used to soften material, melt embossing powders and dry embossing inks among other uses.
Registered Embossing - aligning of a raised image with ink, foil or another image to create perception of depth.
Tracing Wheel - also known as a pounce wheel, can be used as a detailing tool in designs. Creates a dotted line and is available in several sizes.
Find All the Craft Tools You NeedNow that you have the lingo down, we can get into the details of some techniques.
Heat Embossing
This is an easy technique but it does require some supplies including a heat gun, which can be pricey. Don’t use a hair dryer, it will blow all the powder away.

Step One:
Using embossing ink, stamp or draw your design. To draw, you can use a pointed tip or a small ballpoint tip. This will take some practice, so test-draw your design on a scrap of paper. Embossing inks dry slowly and are sticky, use caution not to smudge.
Tool Tip: familiarize yourself with the type of embossing ink you chose and its drying time. If working on a larger design, you may need to work in sections.
Step Two:
Generously sprinkle embossing powder over the image. Tap off the excess. Make sure there are no strays of powder outside the design. Use a fine brush to clean off.
Step Three:
Use a heat gun to melt the embossing powder. Follow the instructions for the powder and heat gun to assure optimum results.
Step Four:
Set aside to set and admire your work.
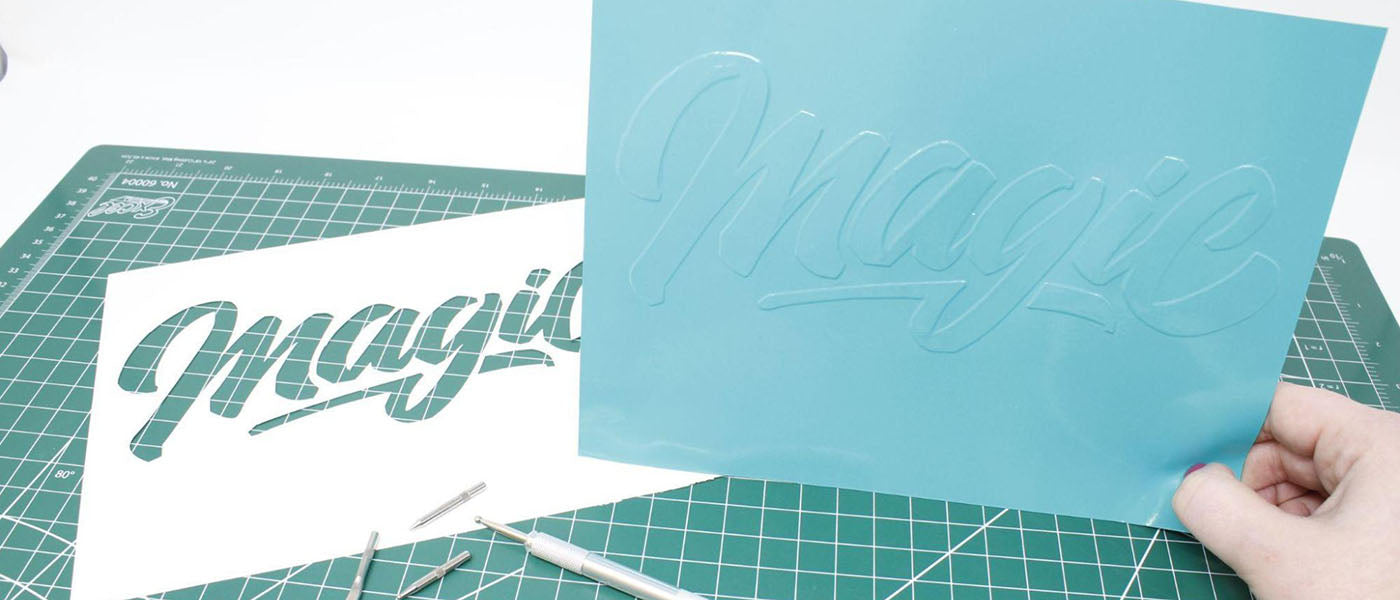
Dry Embossing
Equally easy to master, requires an embossing stylus as well as stencils or flat objects to trace. Using a light box is recommended so that the stencil is visible through the paper. Some papers may rip, always test your paper over the stencil to test out the pressure needed so as to not punch through the paper.
Step One:
Secure the stencil and paper in place so that they do not move while working. Note that you will be working with the backside of the paper, so position your paper correctly.
Step Two:
Using the stylus with the desired tip, trace around the edges of the stencil until the entire design is transferred to your liking. Make corrections as you go along.
Step Three:
Lift the paper off the stencil. This is now a blind emboss and you can leave the design as is or continue by embellishing with paint, inks, glitter or rhinestones.

Cut-Out Embossing
This is a combination of two techniques to achieve an additional dimension of interest. This technique works best on intricate designs like scroll-work, florals or geometric motifs where there are a lot of intersecting lines. This works best where the negative space can be a design factor.
Step One:
Begin with either dry embossing or heat embossing a desired design. If heat embossing, let it fully set before moving on to step two.
Step Two:
Using a hobby knife from a hobby tool set, cut out the negative space from in between the embossed lines and shapes. If the design is made of curved lines, try our K4 Swivel Craft Knife. The tiny blade rotates 360 degrees and easily cuts round and curved shapes.
Step Three:
You can stop the process here or add colored papers behind each cutout.

Texturing Paper:
With just an embossing stylus and a ruler, you can create interesting textures on paper to use in art projects or even paper art. For best results, work on a cutting mat, it provides the optimal working surface for this technique.
Step One:
Place a flat ruler under the piece of paper. Use the grid pattern on the cutting mat to align the ruler and the paper, so that everything is perfectly straight.
Step Two:
Starting at the top of the paper, gently glide the spoon tip stylus along the edge of the ruler with the convex surface. This should create a neat beveled line.
Step Three:
Repeat in desired spacing.
Step Four:
Get creative. Add diagonal or perpendicular lines on top to create a grid or diamond pattern.
Final Thoughts
There are numerous ways to emboss and they each have their own unique ways of adding flare to what you are designing. Embossing can take a few tries, but it is definitely worth it when you have it all figured out!